Your Cart is Empty
User Manual pdf: English, German, French, Italian, Spanish.
The English user manual is also included in the app.
Introduction
Intervalometer
Pluto Sensors
Smart Sensors
Tools
Settings
Thank you for purchasing Pluto Trigger, the most advanced camera trigger solution. To get started with your Pluto Trigger unit, please read the "Introduction" and "Quick Start Guide" sections. In order to get the most of your Pluto trigger, it is recommended to read the sections of different modes as well.
The Pluto Trigger is an advanced, microprocessor controlled portable unit, capable of automatically calculating various exposure sequences, and providing super-fast trigger for high-speed event. The unit is powered from rechargeable Li-ion battery, is equipped with light/sound/infrared sensors, an infrared emitter for triggering cameras without cable, a bottom 1/4-20 inch screw for mounting on tripod, and comes with a flannel drawstring bag for carrying it in the field.
The Pluto Trigger Apps for iOS and Android are easy to use and powerful. Besides the sensors embedded in Pluto Trigger, some advanced sensors on your phone are used to trigger your camera in Phone Sensor Modes. The handy tools like ND Filter Calculator will bring your photography skills to the next level. More features will be added in the future updates.

USB charger is not included. You can use any USB charger to recharge the trigger.
Shutter Release, Time-lapse, HDR, Star-trail, Video, Timer
Laser, Sound, Light, Lightning, Infrared, Droplet, Aux, Fusion
Sound, Vibrate, Motion, Distance, Voice, Smile
Depth of Field, Sun Position, ND Filter, Starscape Rule
|
|
|
|
|
|
|
|
|
|
|
|
The shutter release button let you trigger your camera manually.
It is also used as a switch to turn on/off the Bluetooth module. To do this, just press the button and hold for 5 seconds and the Status Led will show notification. Three short blinks means Bluetooth is turned ON, while one long blink means Bluetooth is turned OFF.
Turn off Bluetooth makes the battery life of Pluto Trigger much longer. It is useful when you are taking long time-lapse sequence. You start the program and then turn off Bluetooth. Pluto trigger runs at about half power consumption. When you need to change settings, turn Bluetooth back on.
The Status Led can be set to five modes as follows:
|
1 |
Off |
All led notifications are turned off |
|
2 |
Program Start/End |
Blink led when Program starts or stops running |
|
3 |
Camera Trigger |
Blink when Pluto trigger your camera |
|
4 |
Periodic Notification |
Blink every 5 seconds, indicating Pluto is power on |
|
5 |
Always On |
Led is always on to show remaining power |
Note: Display mode with high number also covers all led notifications with lower number. For example, if display mode is set to 4-Periodic Notification, Pluto will show all led notifications, which include 2-Program Start/End, 3-Camera Trigger and 4-Periodic Notification.
Three short blinks always means Start; one long blink always means Stop.
The color of the Status Led shows the battery level of Pluto Trigger, Bluetooth and Infrared signal.
|
Green |
100% |
|
Yellow |
60% |
|
White |
40% |
|
Red |
20% |
|
Blue |
Bluetooth |
|
Purple |
Infrared |
|
|
|
Use this mode when you only need to take a single picture manually. Depending on the mode settings, the Pluto Trigger either simply instructs the camera to release the shutter with the current in-camera settings, or attempts to time an arbitrary exposure by using camera’s Bulb mode.
You can choose one of the following release modes to take a picture:
For “Hold”, “Lock” and ”Bulb” release modes, set your camera to BULB mode. For others, you may use any exposure mode on the camera, including fully automatic exposure modes. Please note that Manual focus mode should still be used.
Usage
NOTE 1: If you would like to pre-focus before exposure, switch your camera to Auto focusing; and select appropriate focus time in app’s “Settings” menu, depending on the light condition and your camera model.
NOTE 2: Depending on your camera model and chosen mode, select appropriate shutter pulse length in app’s “Settings” menu. For example, you may need to choose longer pulse length when Live View is turned on.
Use "Time-Lapse" mode to take a number of pictures separated by a preset time interval with an optional start delay before starting the sequence. The resulting pictures can be used to create a fast motion video.
The basic Time-Lapse mode will use your camera exposure settings. Your camera should be set to Manual mode. Besides the basic Time-Lapse, Bulb-ramping Time-Lapse is available. If Bulb-ramping is enabled for your time-lapse sequence, set your camera to Bulb mode for Pluto Trigger to time an arbitrary exposure.
Usage
Note 1: When the Time-Lapse program has been started, Pluto Trigger can work alone without your phone; all timing and calculations are done on the Pluto Trigger unit. You can disconnect the Bluetooth connection, hide app in background or even close the Pluto Trigger app. Have fun with your phone when taking long and tedious Time-Lapse sequences.
NOTE 2: Turning all of your DSLR settings like exposure, white balance, and focus to manual will eliminate most flickers. However, you may still get a case of “aperture flicker”. Aperture flicker is caused by a DSLR’s inability to open and close the aperture blades of a lens the exact same amount every time. To avoid that, try lens twist:
NOTE 3: If your camera is set at an angle, and your lens is prone to unexpected zoom/focus changes due to gravity, you may want to use scotch tape to fix the zoom/focus rings. On ultrasonic lenses focus setting will not move, but zoom setting may change.
Your camera battery may not be able to withstand a long term Time-Lapse without being powered by an AC adapter. However, you can minimize camera power draw by enabling automatic meter-off timeout in your camera settings. The camera will then go to sleep between Time-Lapse shots. When needed, Pluto Trigger will wake it up and continue its work. With a properly chosen camera meter time-out, you may be able to run hundreds of frames through your camera before its battery is depleted.
You can turn off Bluetooth module of Pluto Trigger after a long Time-Lapse sequence has been started. Just press and hold the shutter release button on Pluto Trigger for 5 seconds. The downside is that you will not be able to check the progress of the Time-Lapse sequence.
If you plan on running Time-Lapse sequences for more than a day, you may want to power your Pluto Trigger from the USB charger. Unlike camera, your Pluto Trigger cannot afford to sleep between Time-Lapse sequences, and thus requires a source of external power for long Time-Lapse sessions.
The Bulb-ramping mode is intended for Time-Lapse users who would like to take Time-Lapse videos in changing light conditions, such as a sunset or a sunrise, which is also known as Holy-Grail in Time-Lapse. It works by gradually changing camera Bulb exposure, achieving a nearly flicker-free exposure transition from bright to dark, or dark to bright. This section assumes familiarity with basic Time-Lapse concepts.
A bulb-ramping sequence consists of taking a set of pictures with constant exposure, then changing exposure in very small increments or decrements for a certain period of time, and then taking another set of pictures with constant exposure.
Usage
Bulb-ramping Time-Lapse may greatly benefit from some preparation work. Before you taking the Time-Lapse, you’d better get exposure metering of a scene at a time of day when you bulb-ramping is planned to be finished. For example, if you plan to shoot a sunset Time-Lapse, get an exposure of the same scene the night before. Set your camera ISO setting to a fixed value, remember the final exposure time, aperture and ISO values used.
Use the following workflow to prepare for bulb-ramping time-lapse:
NOTE: In many circumstances your start exposure will be shorter than what Pluto Trigger allows you to choose. This case would require installing ND filters in front of your camera lens to make exposures longer than 1/20 second.
High dynamic range imaging (HDR) is a process in which a greater dynamic range of light is captured throughout the lightest and darkest areas of an image. HDR Photographs are generally created by shooting multiple photographs using exposure bracketing. After that, they are merged back together into a single HDR image.
With Pluto Trigger, you can shoot up to 19 photos in a HDR sequence. And the exposure step can be set a value from 1/3 to 3 stops.
Due to using Bulb mode, the shortest exposure that can be used in HDR is limited depending on your camera model. In addition to that, exposure close to the shortest limit may be slightly less accurate and may vary in brightness.
Usage
You can use image-processing software to combine these pictures and create an HDR image.
NOTE: You’d better turn “Image review” off on your camera. Otherwise, Pluto Trigger may not be able to take all the photos.
Star Trail mode can be used to take long-exposure image sequences of the night sky. These long-exposure images can later be combined using image processing software to create a night sky picture with beautiful star trails.
Usage
NOTE: Enable Live View on your camera to avoid the vibration caused by mirror flipping.
Video mode is used to overcome the 30 minutes limit of the DSLR camera’s video recording capability. When the recording reaches 30 minutes, camera will stop the recording automatically. Pluto Trigger will restart the video recording immediately.
NOTE 1: Only some cameras are supported in this mode. Pluto Trigger start/stop video recording using shutter release cable or infrared remote. Only a few cameras support controlling video recording with shutter release cable. Some other cameras support controlling video recording with infrared remote, like Canon 70D.
NOTE 2: If your camera supports start/stop video recording by half pressing shutter button like Magic Lantern, set “Shutter Pulse Time” to “Off” and “Pre Focus Time” to 0.5” to use the Video mode.
Usage
Timer mode is used to take photos or record video at certain time period of each day. This is usually useful for Time-lapse of infrastructure projects or growing plants. You need to supply power to camera and Pluto Trigger with AC adaptor for that long period.
You can set the Start Time and End Time to take photos or record video. To take photos, you have the option to set the interval to take photo. And if you are recording video, you can set the retrigger time to 30mins and 3secs to overcome the 30mins recording limit.
Pluto trigger is an advanced MCU controlled device, which has several sensors embedded in. These sensors are ideal for high-speed photography and trigger traps.
High-speed photography usually uses light/laser sensor and sound sensor can respond to the light or sound change in a minimum delay (less than 1 millisecond).
The goal of the high-speed photography is capturing objects in motion. In all cases you want to be able to detect a trigger, wait for an event and take a picture. There are two methods for performing high-speed photography. The first method uses a shutter of a camera. The second method uses an electronic flash.
SHUTTER METHOD
The main advantage of the shutter method is that it can be used outdoors. The subject and the background can be fully illuminated. Since the shutter is used to freeze the motion of the subject, it offers a limited speed. Maximum speed of a shutter could range from 1/4000sec to 1/8000sec, in some cases it may not be fast enough.
Moreover, in cameras that have a focal plane shutter, a small slit moves across the photographic plane at much slower speeds (1/250), thus exposing different parts of the photographic plane at slightly different times.
Finally, there is a delay between the shutter release and the actual exposure. It could be as much 100ms or more (depending on camera). In addition there could be a small variation in timing, each time the camera takes a picture. Therefore this method should not be used when high timing accuracy is required.
FLASH METHOD
The second method of high-speed photography is the flash method. The picture is taken by opening the shutter of the camera, activating the flash and closing the shutter. The picture needs to be taken in a dark room. Because the room is dark, the long exposure time will not have any effect on the final output. The flash light duration now becomes the actual exposure time. The main advantage of the flash method is the exposure speed and better timing consistency. Electronic flashes are capable of light strobes with durations of 1/10,000 or faster (lower the power setting of the flash, the shorter the flash duration).
The lag between the trigger and the flash strobe is insignificant. The disadvantage of this method is that the picture needs to be taken in a dark room to avoid the over exposure. Also since the flash is used to make the exposure, it may be more difficult to provide a uniform lighting or to illuminate the background.
Caution: Laser beam is dangerous. Avoid eye contact. Use the laser source at your own risk.
In laser mode, Pluto Trigger uses its light sensor to detect the laser beam. Whenever the laser beam is broken, Pluto fires the camera. The response time is about tens of micro-seconds, which is very fast.
Usage

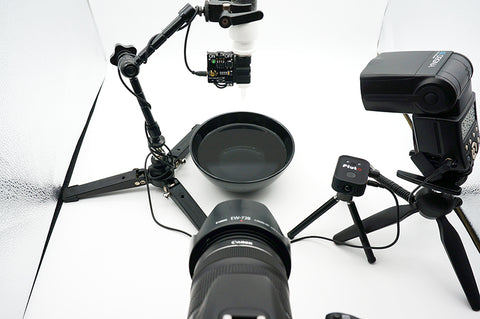
NOTE: If you would like to take photo of high speed object, you should trigger flash rather than camera. In Flash method, the camera port of Pluto Trigger is connected to flashgun, and the camera is triggered by sound with infrared remote, Pluto Trigger should point to the camera. It may not be easy to adjust the angle of Pluto Trigger, because it need send infrared signal to camera and also receive laser beam from laser pointer. Set your camera to IR remote mode and shutter speed to about 2 seconds. Choose the appropriate “IR Remote Mode” and “Camera Brand” in the “Settings” menu. Switch to “Flash Method” mode. Start the program, whistle to release the camera shutter, and then break the laser beam to trigger flash.
Rather than using sound mode as a normal non high-speed sound trigger, here we will mainly focus on using it for high-speed photography.
The sound mode is used for high-speed photography where your regular DSLR camera is too slow to take pictures of popping balloons, breaking glasses, exploding items etc. The idea behind using a sound trigger is very simple. Instead of triggering your camera, you are going to trigger the flash unit. Your camera will be in bulb mode in a completely dark room. Whenever the flash is triggered, you will capture a single frame. Instead of taking many pictures with a high-speed camera, you will capture a single frame with your regular DSLR camera. In this setup, the speed of the flash unit is also very important. The faster the flash unit, the sharper will be the image.
The sound mode has two parameters. These are Sensitivity and Delay. The sensitivity can be set to a value between 1 and 100 using the dial. Setting the sensitivity to a high value will let you to capture more sound events. If you want to capture only high level sound events, you need to set the sensitivity to a lower value. You can try and see which sensitivity level fits your needs. The second parameter is delay. The sound event may be captured too early. So, you need to add some delay. The flash unit will be triggered after the delay you specified and this will allow you to capture the picture at the exact moment.
NOTE: It is often that the sound of camera shutter may make Pluto to trigger your camera again and again. This case would require setting the “Trigger Reset Time” (see Settings chapter) to a bigger value so as to let Pluto stand by for a while.
NOTE: If you would like to take photo of high speed object, you should trigger flash rather than camera. In Flash method, the camera port of Pluto Trigger is connected to flashgun, and the camera is triggered by sound with infrared remote, Pluto Trigger should point to the camera. Set your camera to IR remote mode and shutter speed to about 2 seconds. Choose the appropriate “IR Remote Mode” and “Camera Brand” in app’s “Settings” menu. Switch to “Flash Method” mode. Start the program, whistle to release the camera shutter, and a second sound will trigger flash.
Light mode is similar to sound mode, but use ambient light as the signal to trigger the camera.
Besides the Sensitivity and Delay parameters, Trigger Mode needs to be adjusted before starting the trigger. Trigger mode has two options: “Trigger High” and “Trigger Low”. “Trigger High” means taking photo when the light value is higher than the set threshold (light condition), while “Trigger Low” means taking photo when the light value is lower than the set threshold (dark condition).
Lightning mode is really helpful for photographers who want to take photo of lightning strikes.
Since lightning strikes happen in a short period of time, about 100ms. Human cannot act fast enough to capture the event manually. Normally, to take photo of strikes, you will need to take a lot of long exposure photo and hope to have the luck to capture a good one. This method is limited in two aspects: you take a lot of useless photos and light condition should be dark enough. Pluto trigger addresses this with lightning mode by using the embedded high-speed light sensor and the fast processing program.
Before shooting lightning strikes, the sensitivity of the light sensor should be adjusted. You will need to try and see which value fits the light condition.
You can enable the “Pre-Focus” option to minimize the camera shutter delay, which is equivalent to half-press the shutter button. However, you will not be able to view photos on camera screen until you stop the Lightning mode. Also, it may consume a little more battery power on your camera. Remember to set your camera to full manual mode to minimize shutter delay.
Infrared mode is for wildlife photographers. It detects the infrared emissions from the body of animals and triggers your camera automatically.
No parameter needs to be set. Pluto will trigger your camera whenever there is some change of infrared emissions. And the trigger signal will last for 2-3 seconds. You can change the “Burst” (see the Settings chapter) to take several photos every time animal enters.
Infrared mode is not limited to take photo of animals; you can use it to take photo of each passenger on the street automatically.
What’s more, you can use it as a non-contact shutter release button. Just wave your hand in front of the dome of Pluto Trigger, and the camera takes a photo.
Droplet mode is a mode to help you to take photos of water drop collision easily. You will need a Valve Kit to use this mode. Visit our website plutotrigger.com for details of the Valve Kit.
When the start button is pressed, Pluto Trigger starts camera exposure using IR remote, triggers the valve to release two droplets, fires the flash, and finally the camera stops exposure. The entire procedure is controller by Pluto Trigger automatically. The droplet photo should be taken in relatively dark environment.
Usage
Now, you can start to play with different liquid, color background and lighting.
Aux mode is for DIYers. You can add other sensors that are not included in Pluto Trigger, such as ultrasonic sensor, smoke sensor or temperature sensor.
You will need a 2.5mm audio cable to connect your DIY sensor to the Aux port of Pluto Trigger. The tip of the cable connector is 3.3V and the base sleeve is Ground. Pluto Trigger just samples the signal that is fed into the middle sleeve of the connector. Please make sure the voltage of this input signal is in the range of 0-3.3V.
Fusion mode is more advanced. It lets you combine the sensors available to make it suitable for your special use case.
You have the Fusion method of “AND” and “OR” to combine the sensors. You have to set the parameters of each sensor in its own Mode.
“Smart sensors” use various sensors on your smart phone to trigger your camera.
This mode is similar to the Sound Mode in the Pluto Sensor Modes. The difference is that it uses the microphone on your smart phone, and it may not be as fast as the sound sensor of Pluto Trigger.
Vibration Mode uses the accelerometer of your smart phone to detect vibrations. And if the vibration exceeds the set threshold, Pluto Trigger fires your camera.
Motion Mode uses the camera of your smart phone to detect motions.
You can zoom in/out your camera to define the field of view. This is really useful if you want to take photos only when the subject enter into a certain small area, and don’t want to put your phone too close to it.
You can adjust the sensitivity, as you need. To detect small subject, make the sensitivity higher. A value bar above the preview indicates the real-time level of motion.
Distance Mode is good to take photos when you travel in your car. Compared with taking photo at a specific interval, using distance parameter will make you get better output footage. It will not take a lot of photos when you just stop your car waiting.
While Sound Mode only takes sound volume into account, Voice Command Mode is much smarter. It recognizes the voice command “Pluto” and fires your camera. Other noise will be filtered out, no matter how loud it is.
Smile mode is good for taking selfie photos. It is able to detect your smile and fire the camera. When your smile is detected, the app will make a “Dong” notification sound, and fires the camera 1.5 seconds later. If you want to stand far away from the phone, you can use the zoom slider to make smile detection still working.
Depth of Field (DOF) is the range of distance in a photo that appears to be in sharp focus. Depth of field is a creative decision and one of your most important choices when composing nature photographs.
Based on the focal length, aperture and camera type you have entered, DOF calculator calculates the hyper focal distance. This is the focus distance where everything from half the hyper focal distance to infinity is within the depth of field. This is useful when deciding where to focus such that you maximize the sharpness within your scene,
Use the actual focal length of the lens for depth of field calculations. The calculator will automatically adjust for any "crop factor" for the selected camera.
Sun Calculator calculates the time of official sunrise/sunset and civil sunrise/sunset based on your location and local time. The period between civil sunrise and official sunrise, together with the period between official sunset and civil sunset, are called civil twilight. The sun is below the horizon, but its light is visible because it illuminates the upper layers of the atmosphere. Due to diffused light and different shades of color in the sky, civil twilight is ideal for portrait and landscape photography.
The sunrise/sunset time is also very useful if you are taking sunrise/sunset Holy Grail time-lapse. You will need to set the start time of Bulb-Ramping based on sunrise/sunset time.
For convenience, two countdown clocks are provided to show the forthcoming sunrise/sunset events.
ND Filter Calculator is a utility that helps you determine the correct exposure time/shutter speed when using Neutral Density Filters. Set the filter you are using and the shutter speed without the filter and the calculator calculates the new shutter speed with your filter(s) fitted. Press the button to start the camera exposure.
When taking pictures of the sky with stars at night, a long exposure time is preferred in order to get as much light as possible onto the image sensor of your camera. However, there is a limit if you are not taking star trail pictures. To get sharp dot stars, you should not cross this limit. The exposure time limit is calculated with a formula called Rule of 500.
You select camera model and actual focal length; the slowest shutter speed is calculated automatically with the crop-factor of your camera already accounted. Press the button to start the camera exposure.
The stars near the equator move much faster than the stars near the poles. You can choose Rule of 500 or 400 for fast moving stars.
Change these settings to control the timing of trigger signals.
Default: 0 - Manual Focus
Depending on the mode Pluto Trigger is running, you should choose different focus time.
For high-speed photography, fast response is critical. Your camera is set to manual mode. You should choose “0-Manual focus” to tell Pluto Trigger no need to focus before release shutter.
If you set your camera to Auto-focus mode and want the camera pre focus before exposure, then choose appropriate focus time depending on the light condition and your camera model. Please be noted in auto-focus mode camera will not take picture if it doesn’t get focus. You are not guaranteed to have your camera triggered in the mode.
In time-lapse mode of timer mode, you may like to put your camera into sleep mode during the long interval to save a lot battery power. Then you can set pre focus time to “0.5" - Pre Wake Up” in order to wake your camera up before taking next picture.
Default: 150ms – Camera
Shutter Pulse Time setting depends a lot on what device your want to trigger. For speed flash, a shot pulse works fine. For normal cameras, 150ms is adequate. If that is not enough to trigger you camera, choose longer time.
Default: 3"
Trigger Reset Time is very important in those sensor trigger modes. It determines how often the trigger can be fired. The default value is 3”, which means the trigger will not fire in the 3” period after trigger fires. Using this setting, you can purposely ignore some unwanted trigger event (like camera shutter sound), and also set the minimum trigger interval.
Pluto Trigger can control your camera via infrared. Many popular camera brands are supported. For some camera models, you can even start/stop video recording using infrared signal. For cameras without shutter release port, infrared control can be a good option. And this makes Pluto Trigger support many more cameras.
Default: Off
Use this setting to make Pluto Trigger emit different type of infrared signal. Available options are: Off, Single, 2S and Video. Certain mode may not work, depending on the setting “Camera Brand” below.
|
Brand |
Single |
2S |
Video |
|
Canon |
* | * | * |
|
Nikon |
* |
|
|
|
Sony |
* | * | * |
|
Panasonic |
|
|
|
|
Olympus |
* |
|
|
|
Pentax |
* |
|
|
|
Minolta |
* | * |
|
|
PowerShot |
* |
|
|
Default: Off
Change this setting to match you camera brand. Infrared remote of different brand emit different signal.
You can set this setting to “All brands”, then Pluto Trigger will emit infrared signal of all brands. Thus, you can use Pluto Trigger as an infrared remote for all supported brands.
Change this setting if you want to take multiple pictures when trigger is fired. This setting only applies in “Pluto Sensor Modes”.
Default: 0
Set this value to the number of pictures you want to take when Pluto Trigger is fired.
Default: 0.5”
Change this setting to set the time interval, at which multiple pictures are taken.
Default: “Periodic blink”
Change this setting to set when the Status Led show notifications.
|
1 |
Off |
All led notifications are turned off |
|
2 |
Program Start/End |
Blink led when Program starts or stops running |
|
3 |
Camera Trigger |
Blink when Pluto trigger your camera |
|
4 |
Periodic Notification |
Blink every 5 seconds, indicating Pluto is power on |
|
5 |
Always On |
Led is always on to show remaining power |
Use this setting to enable/disable the App sound notification.
Reset all the settings to default values.
When new version is available, you can upgrade the firmware in Pluto Trigger over the air.
To upgrade firmware, follow the instructions in the app.


